Easy pizza dough 🍕

Two ingredient pizza dough? Must be lies.


I saw this recipe amongst the insta realms and was convinced it was one of those fake recipes, the kind where the picture isn’t an accurate representation of the actual recipe. BUT, after trying and testing, I can happily report that this recipe is true. Miracles do happen.


This recipe will most likely work with any flour, so far I’ve tried it with rye flour and self raising gluten-free flour and both were successful. I reckon oat flour will work well too, however steer away from coconut flour or almond flour as they can’t be directly subbed.


Ingredients:
45g Rye flour
75g Non-fat greek yoghurt (I used Fage 0%)
Salt to taste
Some extra flour for rolling dough on surface

Method:
Mix flour, salt and yoghurt and you’ll get a sticky dough – please note differing brands of yoghurt or flour will vary the recipe slightly eg. fage isn’t as liquid-ey as other yoghurts.

Then, pour sticky dough ball onto a floured surface and knead until it isn’t sticky anymore.

Pre-heat oven to 170 degrees C, spray a medium sized non-stick pan with oil and flatten your dough ball into it, bake for just under 10mins until base is cooked through.


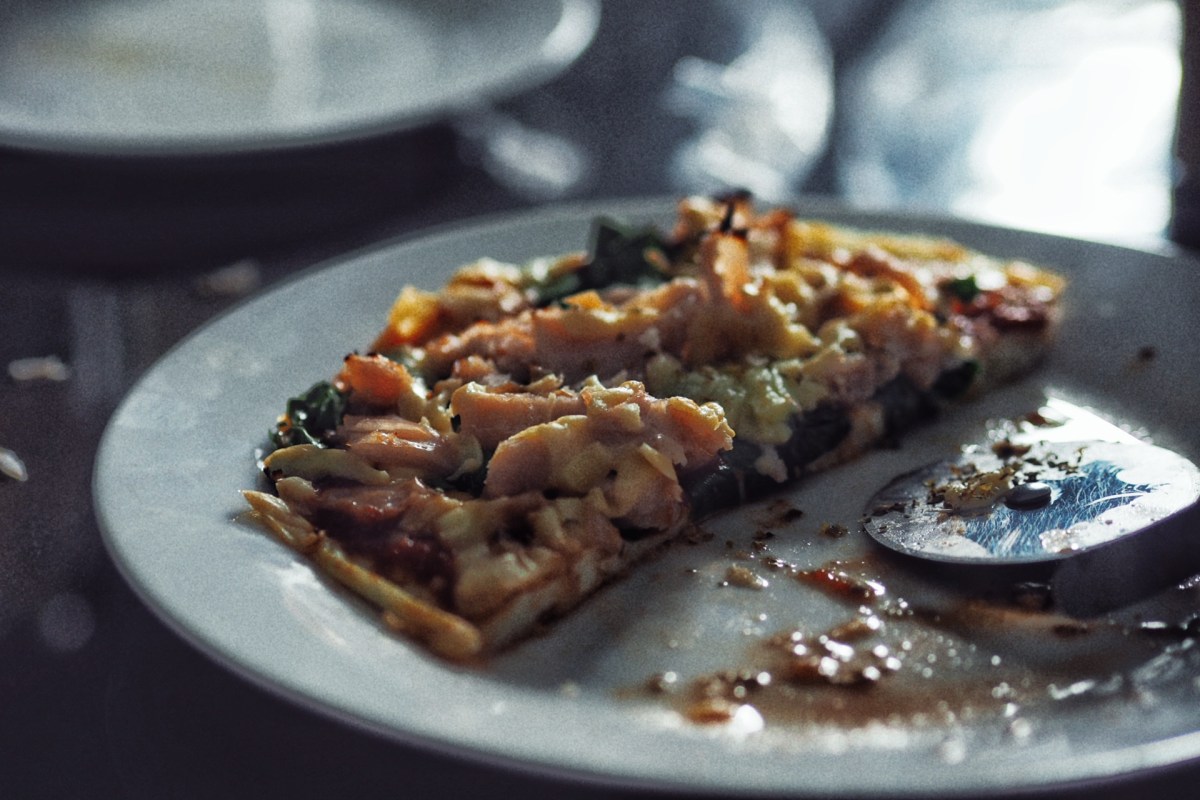
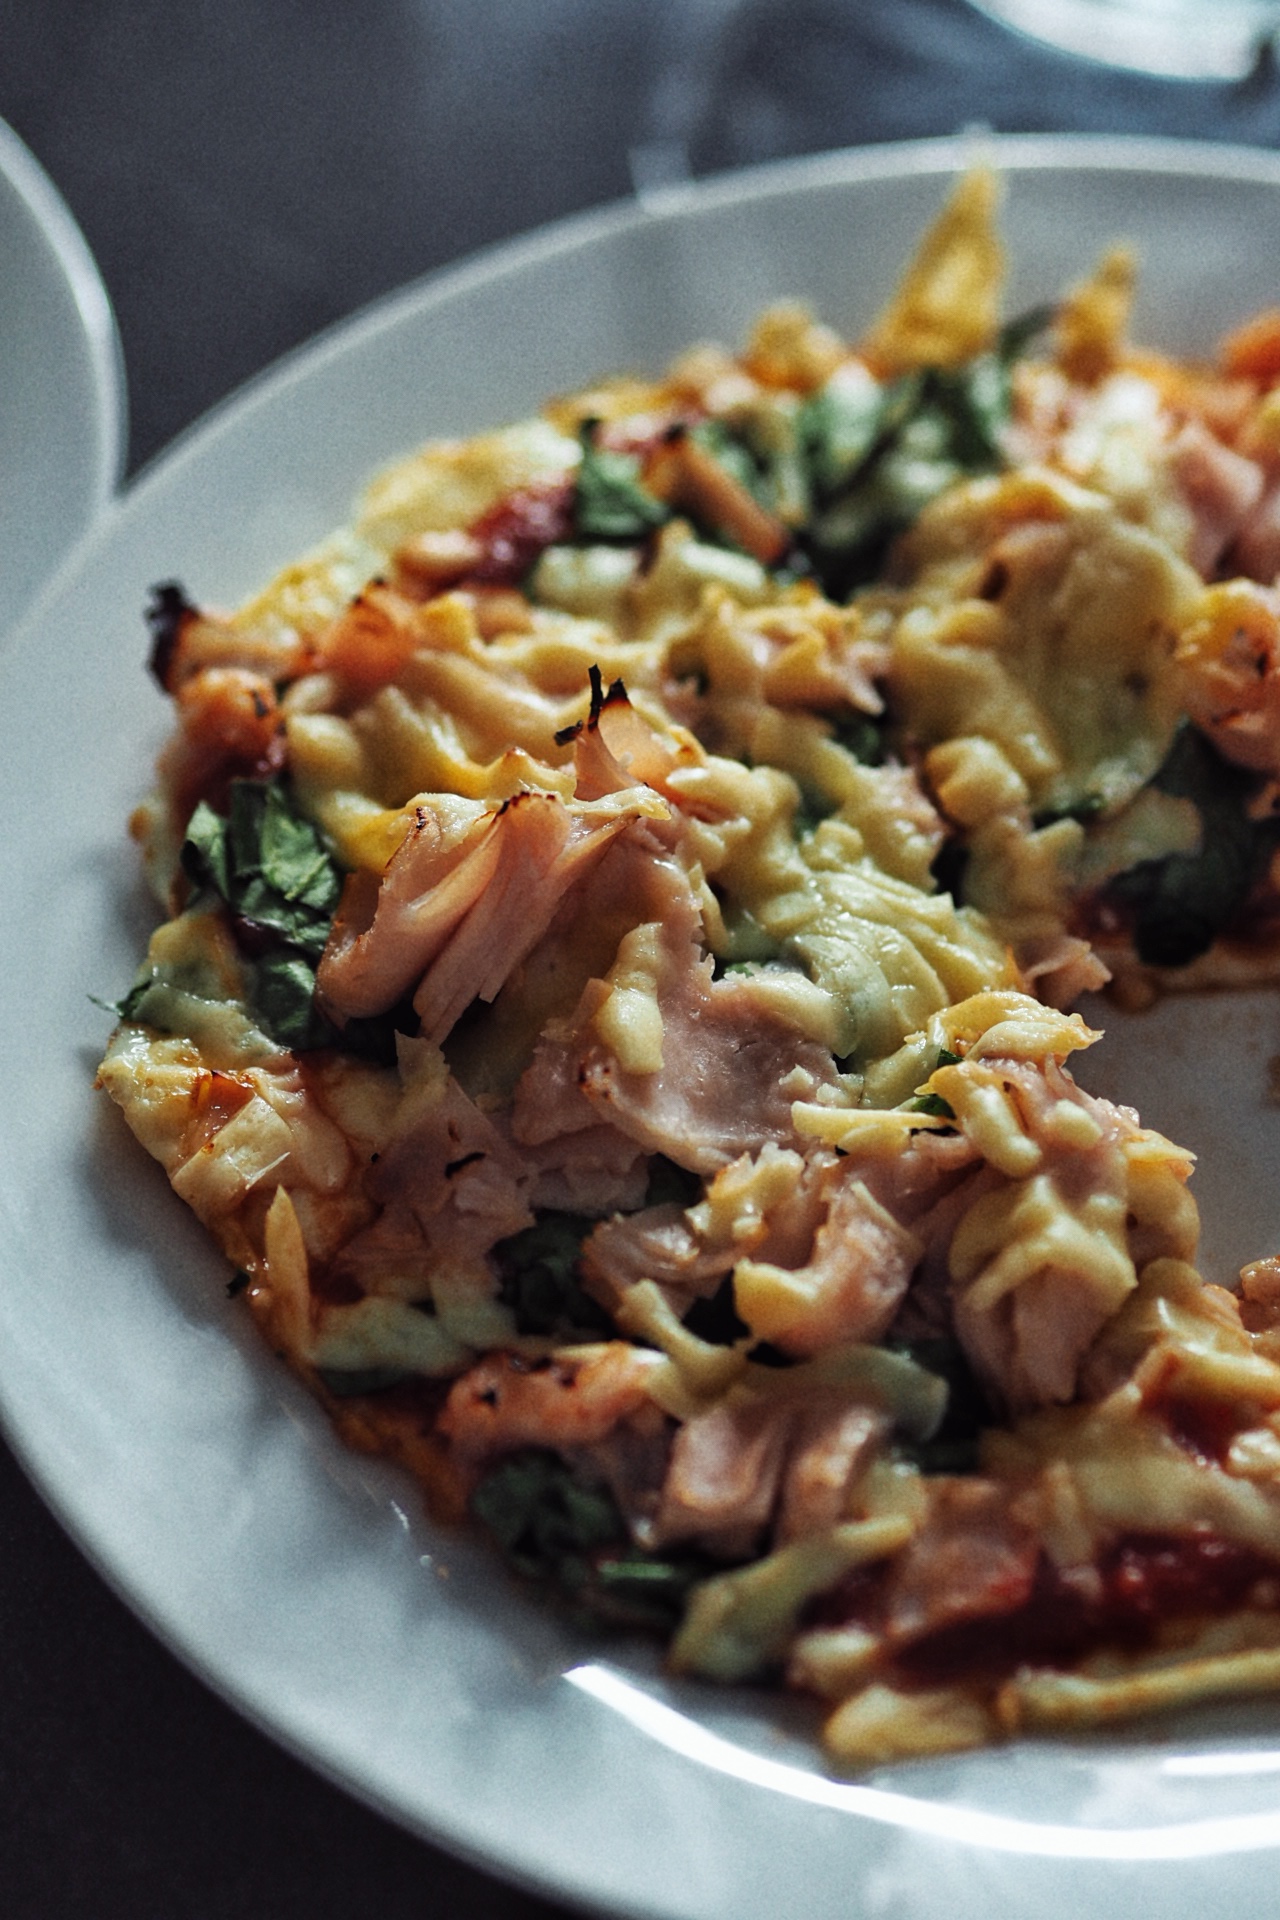
Remove from oven, finish it with your preferred pizza toppings and return to oven for your cheese to melt and until dough has browned on the edges.

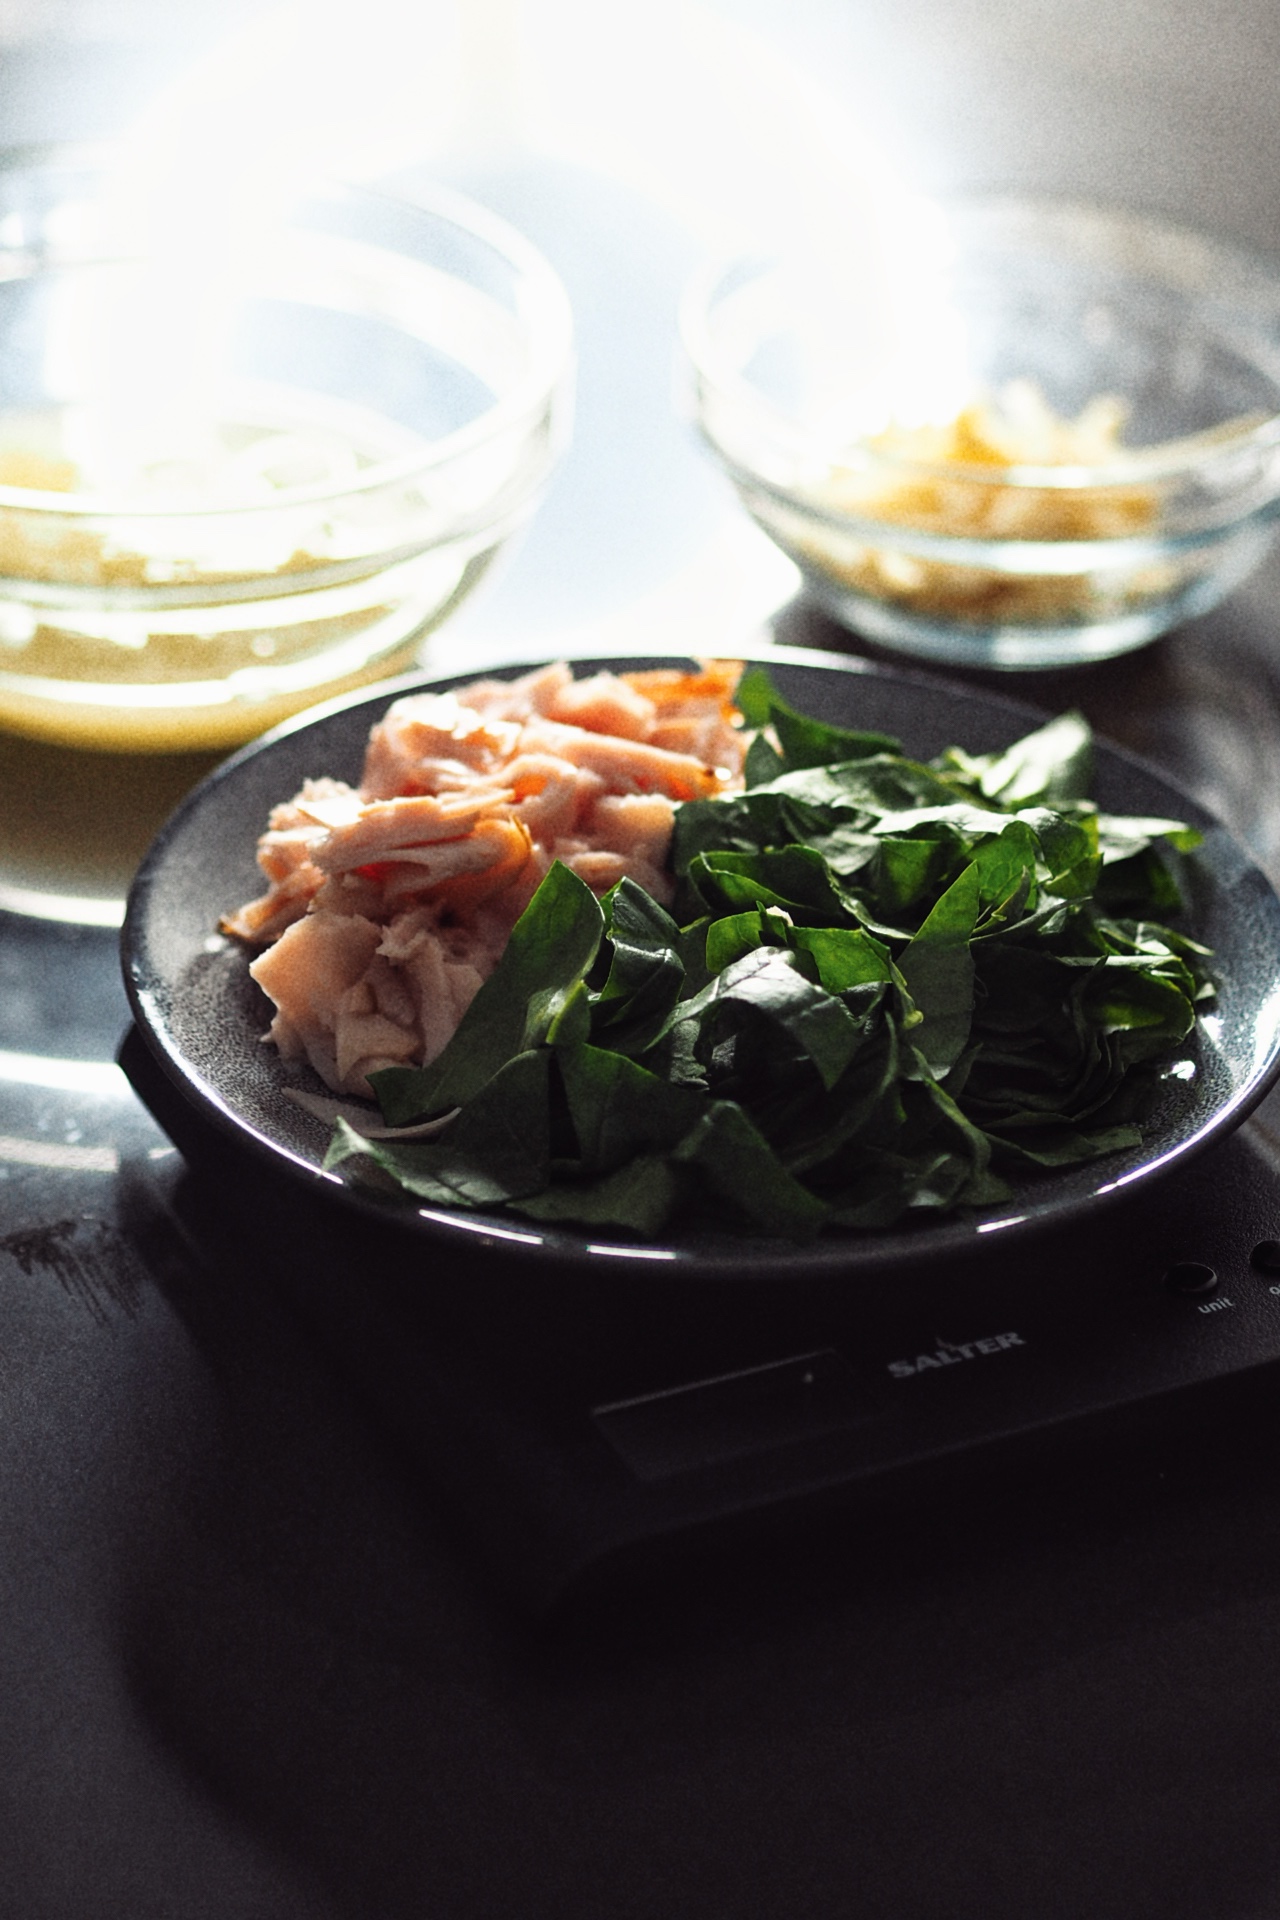
For this pizza I used low-fat cheese slices because I was out of mozarella, grated vegan cheese (I had some in fridge), chopped cooked ham and zero bbq sauce as the base – whole pizza came to approx 360cals.


Next time I’m going to make this recipe in bulk so i can keep some dough balls ready in the fridge for when I need them, yes need.


Don’t forget to follow the blog to receive these recipes directly to you inbox, or you can follow me on instagram for more recipes, tips and nonsense.

All recipes are created by myself so if you find yourself using them for anything (which i don’t mind) please credit me, its the least you can do.


For discount on iherb – use my code JCB887 (multiple use code).

How to: Pizza Omelette 🍕

You had me at pizza.

Pizza is often seen as a taboo food item, comprised of all the ingredients that are seemingly seen as ‘bad’. But, is pizza bad? Not really. Eaten in moderation, it can be enjoyed as part of a balanced diet but the problem lies in understanding how to include this delicacy as part of your intake.

For me, its hard to include a whole pizza into my daily calorific needs unless i don’t eat much all day which is VERY unlikely because i like to eat regularly throughout the day. So, this really takes away those pizza cravings without the added calories (or guilt).

If this is you too, then heres how to:

1. Prepare your base.

You can make your base with egg whites (as i did) or with eggs like you would a normal omelette. I just choose to do it with egg whites only (because I would much rather have all the fat content from cheese).

In an oven-safe pan make your omelette, leave it cooking on medium heat until cooked through without flipping it over. Then remove from heat and move to step 2.

2. Choose your sauce.

Here we used some Biona Passata sauce which we had left over from some pasta but i like using tomato puree or zero bbq sauce (when i don’t fancy tomato). There is no wrong way about it, just use whatever you like and get creative!

Pour the sauce over your omelette base, and before you move to step 3… pre-heat oven to 180 Degrees C.

3. Topping time!

We used fresh spinach leaves, turkey slices and cheddar but you can make any variation you like. The only thing you have to be wary of is the cheese! Its easy to overdo it so make sure you weight out a decent portion rather than loading it on. This was just 40g grated cheddar and it was more than enough. I prefer using Mozzarella, it melts better and imo, is much nicer + has a better nutritional content… but we were out and had to improvise.


Pack your toppings onto the sauced omelette base and proceed to step 4.

4. Bake it!

Now, this part might get you by surprise but you’ll need to bake it in the pan! Yes, just as it is… put the pan with your ready made pizza omelette and bake until your cheese is deliciously melted and golden.

5. ENJOY!

You’ll have to wait for it too cool a little bit, then transfer onto a plate and BOOM, omelette pizza. Ready to satisfy your cravings!


Honestly, don’t diss this recipe until you try it! Everyone who has tried it, has loved it – especially as it means you can enjoy ‘pizza’ more often than not.


Heres the exact recipe:

Ingredients:
200g Egg whites (approx 5-6 egg whites)*
40g Tomato passata
100g turkey slices (chopped)
30g Spinach leaves (chopped)
40g Light Cheddar cheese
1 Tsp oregano
1 Tsp olive oil
Sprinkle of salt

*I hadn’t had much protein all day and needed to make up for it so packed on the egg whites, you don’t need to use this much.

Method:
Add olive oil to a med-large pan and heat on med heat.

Once oil is hot, add egg whites and leave to cook as mentioned in STEP 1.

Pre-heat oven to 180 Degrees C. Add sauce to omelette base, then toppings, oregano and salt. Alternatively you can add the salt to the omelette while cooking.

Bake in oven (in the pan) until cheese melts and is deliciously golden.


The beauty of this recipe is that you can get really creative and make it suit your exact taste preferences – no matter how wild.

Don’t forget to tag or share. We love to see 🙂

Get exclusive discounts on iherb using code: JCB887

Follow me on instagram for more recipes, videos and nonsense.

How to: Quinoa 🍚

If you don’t like quinoa, we can’t be friends.


Quinoa {keen-wa} – is it a seed? Is it a grain? A debate we are not here to discuss because there is a more pressing issue: eating it.

Its my favourite thing to eat at home, so i collated my favourite ways to eat them…get ready to jazz up your plain quinoa.Life changing.


EGG-FRIED QUINOA


Egg-Fried Quinoa
Ingredients:
1 Cup Cooked Quinoa
5 Egg Whites
2-3 Tbsp Soy Sauce (Or Tamari if needed gluten-free)
Sprinkle of salt

Method:
1. Heat a pan on medium heat with a bit of spray oil.
2. Once hot, pour the egg whites and salt and cook like you would scrambled egg, moving around until egg is mostly cooked.
3. Add quinoa and soy sauce and mix together, keep moving until egg has fully cooked through.
4. Remove from heat and enjoy.

LENTIL MEATBALLS WITH QUINOA


Follow our Lentil ‘Meat’ Ball recipe and enjoy on a bed of your ready made quinoa.

RICE WRAPS WITH VEGGIES & QUINOA


Ingredients:
2 Rice Wraps*
40g Avocado (Sliced)
50g Roasted Sweet Potato Cubes
50g Spiced Tofu (optional) 1 Tbsp Spicy Brava Sauce
Sprinkle of salt
Large bowl with lukewarm water
*You can find these in the chinese food section in most supermarkets or grocery stores.

Method:
1. Prepare all your ingredients and a large chopping board next to your bowl of lukewarm water
2. Grab a rice wrap and immerse it into the lukewarm water until fully covered for about 3 seconds so that it goes a bit soft but still manageable.
3. Lay carefully onto chopping board and repeat (2.) with second rice wrap. Place second wrap with half of it overlapping the first.
4. Layer ingredients as you please.
5. Roll wrap together carefully, tucking in the edges before wrapping fully.
6. Drizzle with the spicy brava sauce and enjoy!

LENTIL STEW WITH QUINOA


Ingredients:
500g (Cooked) Pardina Lentils
100g Mixed Frozen Peppers
1 Chopped Onion
1 Tbsp Frozen Garlic
Handful Chopped Basil
4 Tbsp Marigold Vegan Stock
6 Tbsp Smoked Paprika
2 Tbsp Italian Herbs
2 Tbsp Olive Oil
1.5 Ltr Water (Boiling)
100g Roasted Sweet Potato Cubes
2 Cups Cooked Quinoa
Sprinkle of salt & pepper

Method:
1. We pre-cooked the lentils for this recipe, but you can also use can or jar lentils which come ready made.
2. In a large sauce pan bring olive oil to heat on a medium setting, then add onions and garlic. Once onions have softened slightly, add mixed frozen peppers and keep moving until peppers have softened too.
3. Add all the remaining ingredients, except for the quinoa and bring to a boil.
5. Reduce heat and leave simmering for approx 15mins.
6. Fold in quinoa and leave simmering for another 10mins.
7. Remove from heat and leave to settle, then enjoy or pack it up for the next day.

Note: The lentils will settle even more if you store them for the next day, so dont worry if you think they have perhaps come out too liquid(ey).

This recipe is made to suit my preferred tastes, but you can add/ swap ingredients and flavours as you see fit.

Hope you enjoyed these recipes! Please tag us if you make them, we love seeing you re-make our creations 🙂


Recipes created by @themusclebaker

How to: Overnight Oats 🍨

Overnight oats became all the rage about 5 years ago, when all the health gurus were touting its awesomeness, flooding the blogosphere with grams of overflowing oat jar creations.

But, they weren’t wrong about the awesome part. There is a huge benefit in eating overnight oats (aside from the time-saving). As the oats soak overnight, their starches break down which improves digestibility. The soaking acts like a long cooking, which you won’t get from just heating them in the microwave or in a saucepan. (You’ll find that most people who suffer from digestive problems, find overnight oats much easier to stomach for this reason).

So, we are re-visiting this old craze because it’s a gem that needs to be revived!

(Not to mention all the crazy combos you can make with it!)

Here is our how to:


CHOOSE YOUR LAYERS
You are going to need a milk, a ground seed like flax or chia (or both), 30-40g oats, a filling like nut butter or jam, and fruit of choice. Extras include protein powder, yoghurt, syrups, nuts, seeds, chocolate chips (whatever you may fancy).


UPCYCLE YOUR OLD JARS
Save used jars for these overnight oats, not only do they look cool in a jar but you’re helping the environment too.

I love making them in almost over peanut butter jars as it soaks in all the hard to get to peanut butter that always gets left behind (or thrown away).


MIX IT UP
Add milk and ground seeds to your jar and mix, follow it with oats, peanut butter, jam, fruit, seeds and whatever else you may or may not wanna add. Give it a good swirl so that the oats are all soaking in the milk, helping give it a swirly pattern too!


LET IT SOAK
Leave in the fridge to soak overnight and bam. Ready to eat oats!


PEANUT BUTTER CHERRY OVERNIGHT OATS 🍒


Ingredients:
3/4 Cup Coconut Milk made w/ a tiny bit of protein powder to thicken up. Use whichever one suits your diet best.
1 Tsp Chia Seeds
1 Tsp Flaxseed Meal
25g Pip And Nut Maple Peanut Butter
1 (generous 🙄) squeeze of Bulkpowders Zero Maple Syrup
Handful of Waitrose frozen cherries
1 Savia Soy Yoghurt
1 Pack Quaker Oats GF Oats (30-40g Oats)

Method:
1. Pour milk, chia, flax and oats in your jar and roughly mix.
2. Add peanut butter, cherries and yoghurt + whatever else you want in there and again mix roughly.
3. Close your jar and leave overnight.
4. Enjoy the next day with a hot cuppa!


The beauty of this recipe is that you can make as many different creations as you like, so long as you follow the basic how to.


Look forward to seeing what combos you guys come up with! Don’t forget to tag us if you make them, we love to see. Find us on all social outlets @themusclebakery/ @themusclebaker 🙂


Fancy some creamy oats? Check out our How to: Make Creamy Oats


For 20% discount on Bulkpowders use code: MUSCLEBAKERY20 | 10% discount on iHerb using code: JCB887

All recipes created by The Muscle Bakery and subject to copyright.

How to: Make Savoury Oats 🍅

There are actually people out there who dont like oats or porridge. We, of course, are not them.

We truly believe that oats is an anytime of the day kinda meal so, to prove this theory, decided to have a whack at creating a savoury oat combo. The outcome was even better than we imaged it to be, it was SO SO good and much more filling than toast would’ve been!

(Not to mention all the added vitamins and minerals this combo brings!)

Naturally, we couldn’t wait to share it with you…

Here is our how to:


HEAT UP MILK WITH FLAVOURED STOCK
Choose your favourite milk, you will need 3/4 cup per serving and 1/4 cup of stock (for every 33g of oats approx). Pour it into a saucepan and move to the next step…


ADD YOUR FAVE HERBS AND SPICES
You can choose your favourite herbs and spices for this, keep it simple or as crazy as you prefer. (Scroll to bottom for exact recipe).


LET IT GET SOME FLAVA
Bring the milk, stock and herb mix to a boil, then add oats and 1tbsp flaxseed meal/ ground flaxseed.

We use packs of 33g Gluten-Free Quaker Oats so it will be approximately that much oats you will need if not using single packs.

Let it all simmer until the oats have soaked up most of the liquid and has formed into porridge texture.


PIMP IT UP
Pour into a bowl and add your toppings. We chose some smashed avo, tomatoes, black olives, grated vegan cheese, toasted sesame seeds and sprouts. (What happens when you can’t choose between avo toast and oats).


SMASHED AV-OATS


Ingredients:
1 Pack Gluten-Free Quaker Oats
1 Tbsp Flaxseed Meal/ ground Flaxseed
3/4 Cup Non-Dairy Milk (we used Alpro Coconut Milk)
1/4 Cup Veggie Broth, made with 1 Tbsp Marigold Vegan Bouillon Powder
1 Tbsp Nutritional Yeast
1/4 Tsp Turmeric
1/4 Tsp Smoked Paprika
1/4 Tsp Garlic Powder
1/4 Tsp Onion Powder
1/8 Tsp Chilli Flakes
Pinch of sea salt

Toppings:
1/2 Avocado
1 Small Tomato
1/2 Small can sliced black olives
25g Violife grated cheese
Handful Alfalfa Sprouts
Sprinkle of toasted Sesame seeds

Method:
1. Add milk, veggie broth, nutritional yeast and salt/ spices into a pan and bring to the boil.
2. Add oats and flaxseed and reduce heat, leave simmering until oats soak up most of the liquid and you achieve a porridge consistency.
3. Pour into a bowl and set aside.
4. Mash avocado with a little salt, lemon juice and garlic powder and scoop on top of oats.
5. Add the rest of your toppings.
6. Grab a spoon and enjoy!


Yields: 1 serving

Nutritional Info:
519 Cals | 29.4F | 54.1C (14.3g fiber, 6.3g sugars) | 15.7P

Vitamin A: 18.1 | Vitamin C: 30.4 | Calcium: 224 | Iron: 21

Free from Gluten, Wheat, Dairy, Egg & Vegan


MAS BUENO QUE EL PAN 😛


Look forward to seeing what savoury oat combos you guys come up with! Don’t forget to tag us if you make them, we love to see. Find us on all social outlets @themusclebakery/ @themusclebaker 🙂


Fancy some sweet oats? Check out our How to: Make Creamy Oats


For 20% discount on Bulkpowders use code: MUSCLEBAKERY20 | 10% discount on iHerb using code: JCB887

All recipes created by The Muscle Bakery and subject to copyright.

How to: Make Creamy Oats ✨ 

Apparently there are people out there who still manage to cook their oats wrong or refrain from eating porridge because they don’t like its taste or texture. WUUUUUUUT? 

These people (also known as stupid people) CLEARLY don’t know what they are missing out on! When done right they can be super creamy and delicious. Not to mention how filling they are, packed with all the right nutrients to keep you fuelled all day. Whether you choose to have them for breakfast, for tea or post-workout, you really can’t go wrong with a good bowl ‘o’ oats! 😋


Here is our how to:


HEAT UP MILK
Choose your favourite milk, you will need 200ml per serving. Pour it into a saucepan and bring to the boil.


ADD THE OATS
You can choose to buy sachets of Quaker Oats if you like, we saw some on offer and bought some but they are the same as regular rolled oats which are a lot cheaper. Make sure to go for a Gluten-Free option if you have an intolerance.

You will need 35g of oats. Add them in and reduce heat slightly, keep stirring for several minutes.


MAKE IT SPARKLE
You can add protein powder, we have been using Now Foods Non GMO Soy Protein and it works a treat! A similar substitution would be casein, if any of you can consume dairy this is the one we suggest. One scoop is enough. Maybe you don’t want to add protein, and add matcha powder, lucuma, maca instead… stir that in too and combine it with oats. Keep stirring several minutes until oats have soaked up the mixture and you have a thick and creamy (not clumpy) mix.


PIMP IT UP
Pour into a bowl and add your toppings. We do love nut butters on our oats so you’ll always see some on there when we make them. But, it is upto you (or your macros) what you’d like to add.


DONT FORGET THE SYRUP!
We adore the Zero syrups range by Bulkpowders because they are no calorie, sugar-free yet taste great! (Meaning we get to add loads of it tee hee) However, any syrup you prefer will taste great: agave, maple, coconut nectar, date nectar etc.


We hope you enjoy this recipe as much as we did! Don’t forget to tag us if you make them, we love to see. Find us on all social outlets @themusclebakery/ @themusclebaker 🙂


For 20% discount on Bulkpowders use code: MUSCLEBAKERY20 | 10% discount on iHerb using code: JCB887

All recipes created by The Muscle Bakery and subject to copyright.

How to: Smoothie Bowl 🍧

Over-indulgence during the holidays is a natural thing, however it can leave us feeling quite sluggish and uncomfortable. Whenever we feel like this, we get an undeniable desire to ingest nutrient dense food *cue smoothie bowl*

The wonderful thing about making smoothie bowls is that you can make it as simple as you like or really go crazy with it. You can add extra protein, powdered greens, superfoods and more!


Here is our how to basics:


CHOOSE A FRUIT
Your choice of fruit will be the main component of your smoothie bowl. We’ve tried it with all sorts, this includes bananas, raspberries, blueberries, apples, cherries & mango! Bananas and any berries work the best in our opinion, but dont be afraid to try one that you prefer.


FREEZE IT
Whatever fruit you choose, chop em up, add to freezer bags and pop in freezer till they are completely frozen over. Most supermarkets sell frozen fruit and berries anyway, so if you tend to be short of time or are plain lazy head to the frozen section and grab a few bags.

Waitrose has a great variety of frozen fruit including Bramley apples, Cherries, Tropical Fruit & more!


GET SOME MILK
No matter your choice, any milk will work. We have tried this with Coconut Milk, Almond Milk, Hazelnut Milk and recently have favoured Vanilla Soy Milk.

The reason you need a dash of milk is so that the blender can blitz your frozen fruit with ease.


ADD SOME SPARKLE
Not actual sparkles, but you know… ingredients that add some life to it. At this point it is up to you to use your imagination! We always add some form of protein powder and greens, we have even added nut butter before and it was GOOOOD.

Or if you don’t fancy adding anything, just keep it simple instead.


BLITZ IT
Blitz together in a blender and voila, done! We favour doing this in a NutriBullet or similar as larger blenders won’t mix this as successfully unless you do a larger batch.


Tip: If you want your smoothie bowl to be thicker just add more frozen fruit, or vice versa if you want it less!


See video below for example of texture, this is how we love it.


CHERRY SMOOTHIE BOWL

Ingredients:
1/2 Cup Milk of Choice
2 Cups Frozen Cherries
1 Scoop Vanilla Soy Protein
1 Tsp Powdered Kale
1 Tsp Vanilla Extract

Method:
All all ingredients into your NutriBullet and blitz!

Pour into a bowl, eat on its own or top with your favourite ingredients.


Nutritional Info: 290cals / 1.2F / 24C / 41.8P


Don’t forget to tag us if you try any of these recipes, you can find us on all social media outlets @themusclebakery

For 15% discount on Bulkpowders use code: MUSCLEBAKERY15


HAPPY SMOOTHIE MAKING!

<3